Smooth And Creamy Crustless Cheesecake Pie
Primal Edge Health participates in the Amazon Services LLC Associates Program and other affiliate programs and therefore, may collect a share of sales or other compensation from the links on this page. This comes at no additional cost to you, and all the prices and availability are accurate at the time of publishing.

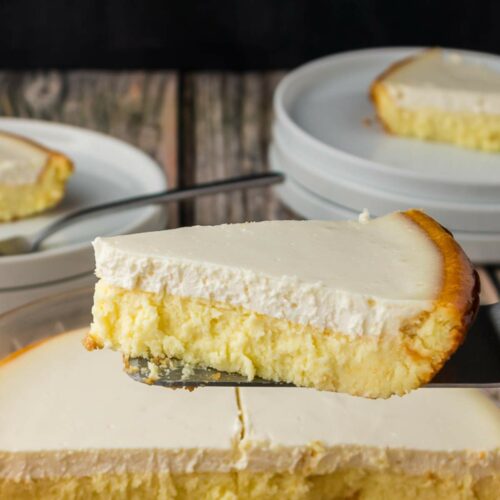
A simple, creamy, crustless cheesecake that bakes up smooth and rich without the hassle of a springform pan or water bath. The tangy sour cream topping adds the perfect finish. Great for holidays, birthdays, and special occasion gatherings.

You guys all loved the mango cheesecake recipe I shared, so here’s yet another treat that I know you’ll equally enjoy – crustless cheesecake! I love being able to skip the hassle of crust-making and still get a naturally gluten-free dessert that rivals traditional cheesecake.
This is my Grandpa’s favorite dessert, and now I enjoy it as a low-fiber, grain-free treat. I’ll save it to pass on to my daughter and keep it going through the generations.
Jump To:
Why My Recipe Works
- 15-minute prep
- Crust-free
- Naturally lighter: Skipping the crust means fewer carbs and calories, making it a win for low-carb and gluten-free diets.
- Make-ahead friendly: This pie sets best with a full chill, meaning it’s ideal to make a day ahead.
How to Make Crustless Cheesecake
To make crustless cheesecake, all you need to do is make and bake the base, add the topping, pop it back in the oven for a few minutes, then set in the refridgerator. The chill time does take a while but it is a crucial step that allows the flavors to fully develop. The filling also firms up at the point, becoming creamy and smooth rather than loose or custardy.
Scroll to the bottom of this post for a printable recipe card with a full list of ingredients, measurements, and step-by-step instructions.
Ingredients You Need

- Butter: For greasing the pie pan.
For the filling:
- Cream cheese: Use full-fat for the best flavor and consistency. Use softened cream cheese to avoid lumps in the filling.
- Granulated sugar
- Eggs: Make sure to use fresh eggs. Do a crack test, float test, and other easy ways to spot a rotten egg.
- Almond extract
For the topping:
- Sour cream: For a delicious, slightly tangy finish.
- Granulated sugar
- Vanilla extract
Step-By-Step Instructions
This is the perfect recipe to try if you’ve never made a cheesecake from scratch before. Follow the easy instructions below and get ready to impress family and friends!


Step 1: Make the base
Preheat the oven to 325 F and lightly butter a 9-inch pie pan.
Beat the cream cheese in a mixing bowl until light and creamy. Add the eggs one at a time, beating well after each.
Mix in sugar and almond extract. Continue beating until the mixture is smooth and lemon colored, about 5 minutes.
Step 2: Bake
Pour the filling into the prepared pie pan and bake for 50 minutes.
Remove the pie from the oven and let it rest on the counter for 20 minutes. Leave the oven on.
Step 3: Whip up the topping
While the pie is cooling, beat the topping ingredients in a small bowl.
Step 4: Return to oven
Spoon the topping evenly over the cooled pie and return it to the oven for another 15 minutes.
Step 5: Cool
Cool completely at room temperature, then refrigerate until fully chilled, at least 4 hours or overnight.

Expert Tips
- Use room-temperature ingredients: Cold cream cheese or eggs can cause lumps, so let everything sit out for 30 minutes before mixing.
- Customize the flavor: Swap almond extract for vanilla or lemon extract. Add orange zest or even a swirl of jam or chocolate to the topping to suit the season or your mood.
- Don’t overmix: Blend just until smooth. Overmixing adds air, which can cause cracks while baking.
- Chill completely: Cooling and chilling firm up the texture and deepen the flavor. This step makes all the difference, so don’t skip it!
How to Store This Recipe
Once completely chilled, cover the cheesecake tightly with plastic wrap or transfer leftover slices to an airtight container. Keep refrigerated for up to 5 days.
To freeze, wrap the whole cheesecake (or smaller, leftover slices) tightly in plastic wrap, then in foil, and freeze for up to a month. Let it thaw overnight before serving chilled.
How to Serve Crustless Cheesecake
The best way to serve crustless cheesecake is chilled, straight from the fridge, so it’s creamy, firm, and refreshing. Slice with a clean, warm knife for neat edges and serve it on its own or with a light topping for extra flavor.
Pair with fresh seasonal fruit like raspberries, peaches, or mangoes and enjoy with a cup of coffee or tea. Guests love this with a glass of espresso martini or a sparkling dessert wine at Thanksgiving, Easter, and other celebratory feasts.
More Cheesecake Desserts To Try
Easy Crustless Cheesecake Recipe
Video
Ingredients
- 1 portion butter for greasing the pie pan
For the Filling:
- 2 (8-ounce) packages cream cheese softened
- ⅔ cup granulated sugar
- 3 large eggs
- ⅙ teaspoon almond extract
For the Topping:
- 2 cups sour cream
- 3 tablespoons granulated sugar
- 1 teaspoon vanilla extract
Instructions
- Preheat the oven to 325 °F and lightly butter a 9-inch pie pan.
- Beat the cream cheese in a mixing bowl until light and creamy. Add the eggs one at a time, beating well after each.
- Mix in sugar and almond extract. Continue beating until the mixture is smooth and lemon colored, about 5 minutes.
- Pour the filling into the prepared pie pan and bake for 50 minutes.
- Remove the pie from the oven and let it rest on the counter for 20 minutes. Leave the oven on.
- While the pie is cooling, beat the topping ingredients in a small bowl.
- Spoon the topping evenly over the cooled pie and return it to the oven for another 15 minutes.
- Cool completely at room temperature, then refrigerate until fully chilled, at least 4 hours or overnight.
Notes
- Let the cream cheese and eggs sit at room temperature for about 30 minutes so the batter mixes smoothly without lumps.
- Mix just until smooth to avoid adding too much air, which can cause cracks.
- Cool and chill completely to firm up the texture and bring out the best flavor.
Nutrition & Macros
To obtain the most accurate representation of the nutritional information in a given recipe, please calculate the nutritional information with the actual ingredients and amounts used, using your preferred nutrition calculator. Under no circumstances shall the this website and the author be responsible for any loss or damage resulting for your reliance on the given nutritional information.